How to Create an Article
The submission of an artilce has been made as easy as possible. It is a matter of completing a form and submitting it when ready! You do not have to complete the form in one go. You can save your submission for completion at a later date. The submission form has been set up to allow you to upload a maximum of ten images and unlimted text for one submission. This guide will explain how to make a submission, what happens during the Approval review and how to manage your submissions.
How to Make a Submission
To make a submission perform the following steps:
Step 1
Login into the site. You can find the login screen on the Home page on the left hand side. Select "Log In" and enter your credentials. If you do not have any log in credentials, you will need to regietr first. Click HERE to learn how.
If you have forgotten your credentials you can click on the "Forgot your password/usernam?" links on the bottom right of the login screen to get them sent to you.
Once you have successfully logged in you will see two new menu items displayed. These are "Submit Article" and "My Article Submissions".
Step 2
Select "Submit Article" from the menu bar. This will open up a new submission form.
The following describes the displayed fields:
- Title - This is the name that Article will be displayed under.
- Article Introduction - This is where you would enter some short text that eludes to the article topic and entices the reader to read the article. This text will be displayed in web search results but will not appear in teh main article.
- Permission to Publish - You have to agree to the publishing terms if you wish to make a submission. You will not be able to progress or save the submission. If you do not agree to the terms relating to publishing, do not make a submission!
- Article Status - By default this is set to Draft. Only change the status whhen you are ready for your submission to be reviewed.
Complete the fields above as appropriate to your proposed article. Once you agree to the publishing terms additional fields will be displayed.
Step 3
You will need to select the Main Category for the article. Only one category can be assigned.
Select the category that best suits your submission from the drop down list. If you can not find an appropriate category, select "Other" from the list. This will display the "Propose New Category" field. Enter a category name that you would believe better suits your submission.
Note: It will be up to the discretion of the Approver to accept the new category. If accepted, the category will be added to the list and your article will be assigned to it. Otherwise an appropriate category from the existing list will be assigned by the approver.
Step 4
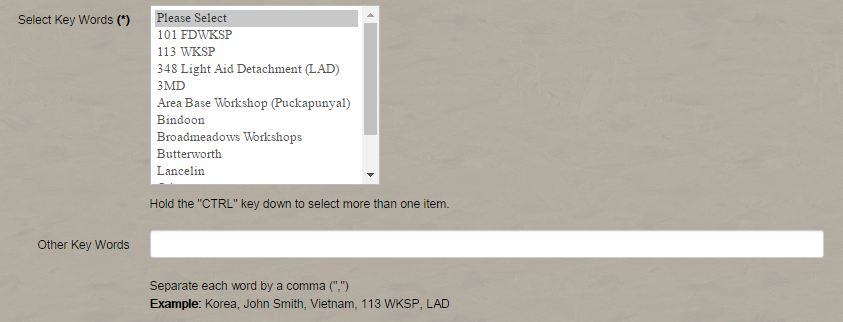
Select appropriate Key Words for your submission. Key words are used by web search engines to help web users find your articles. It is reccommended that you do not select more than six words. Search engines such as Google will downgrade your site in the results list if too many key words are used. The key words are also used by the sites search function.
To select more than one key word, hold the "CTRL" key down and select all the pertinent words. As like Category List, you can suggest additional key words. To suggest new key words click into the "Other Key Words" field and enter the new words. Ensure that you include a comma (,) between each key word(s). Key words can be made up of a couple of words together. For example, a person or unit name.
Note: It will be up to the discretion of the Approver to accept the new Key Word. If accepted, the Key Words will be added to the list and your article will be assigned to them. Otherwise an appropriate Key Words from the existing list will be assigned by the approver.
Step 5
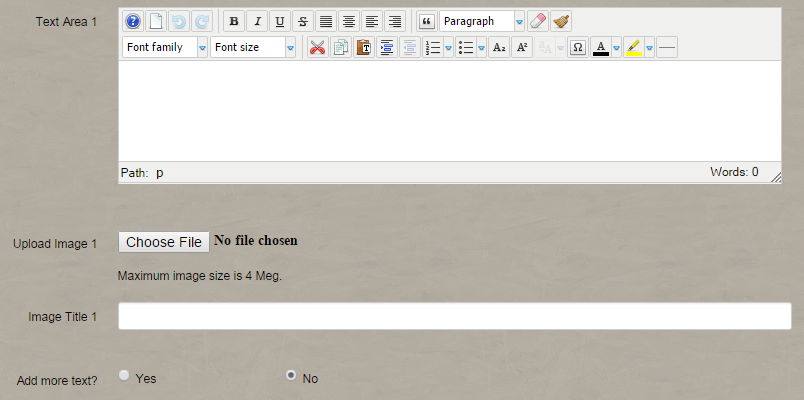
Next is to complete the article text section. There are a total of ten (10) Text Area Blocks numbered 1 through 10. Each subsequent block is displayed when the option "Add more text?" is ste to "Yes". When the article is generated the content will align with the order of the information is entered into the form.
The following describes the displayed fields:
- Text Area (1 to 10) - This is where you type your text of your article. You can change the way the text is presented by using the options in the menu. This is very similar to most word processing applications and is mostly self explanatory.
- Upload Image (1 to 10) - To upload an image click on the "Choose File" button. This will display a file explorer window. Navigate to the image you want to upload (only image files will upload ie. jpeg, gif, png extensions). Select the image and lick open. The text will display next to the button. The maximum file size to upload is 4 Meg. Note that once the submission has been saved the selected image will be uploaded and a small image of the file you uploaded will be displayed. To change the image, just repeat the original steps of clicking on the "Choose File" button.
- Image Title (1 to 10) - Place a short text description of the photo. The text will be displayed directly below the photo in the article.
- Add More Text? - Selecting "Yes" will display the next tyext area for input.
Note: You do not need to populate the Text Areas. You may only wish to display up to 10 photos only. This is acceptable although it is reccommended that you at least populate the first text area to introduce the photos. Photos will often mean a whole lot more if there is some context around them. You should also try and give a year that the photo(s) was taken as well.
Step 6
As you are completing the form you can preview how the article will look. At anytime you can click on the "Preview Article" button near the bottom.
The preview will display the article in a new window. It will only provide you an indication of how the article will look when published. Your photos will only be displayed once they have been uploaded (submission has been saved), an alternate image will appear in the position in the article that your image will hold.
Step 7
Once you are happy with the content of your submission you need to change the Article Status from Draft to Publish.
Once the Article Status has been changed to "Publish - Ready For Review" the "Save & Submit for Review" button will be displayed. By clicking on the "Save & Submit for Review" button you will save any changes you have made and an email is sent to all Approvers notifying them there is a submission ready to be reviewed. How long the review process will depend on the availability of Approvers and if there are changes to be made to your submission.
That completes the initial creation and submission of an article. Remeber that you can Save your submission at anytime to allow you to complete it at another date. How to access your saved submission will be explained in the "Managing Your Submission" section below.
During Approval Reviews
Once you have submitted your article for review you may receive an email notfying you that your submission was not approved. This will be accompanied with a message explaining why. The email will also give you instructions on how to navigate to your submission so that you can make changes as requested.
Once you have navigated to your submission you will note the additional field located at the bottom of the form. This is where you can notify the reviewer that you have made the requested changes or ask for more clarrification of the concern.
Make your notes to the reviewer and click on the "Email Reviewer" button. This will save your changes and email your message to the reviewer.
Once your submission has been approved and published, you will receive an email informing you that your submission was successful with a direct link to the article so that you can view it.
Managing Your Submissions
To view and manage your submission click on the "My Article Submission" tab on the menu bar. This will open the management page seen below.
The page is divided into three sections; Draft Articles, Submitted for Review articles and Published article section. The sections are self explanatory. If you are not sure what an icon means, place your mouse cursor over it and a tool tip will be displayed.
You will notice that in the Submitted for Review section that there are three icons. These are to represent where the article is in the review process. Tick is Approved, the cross is rejected and the question mark indicates that the article is yet to be reviewed. If an Approver rejects a submission their notes explaning the reason will be displayed next to your submission.
Once you have submitted an article for review or has been published, you will no lonnger be able to edit your submission.


